What is Android?
Waited by Mark L. Murphy
Android is a software stack for mobile devices that includes an operating system, middleware and key applications. This beta version of the Android SDK provides the tools and APIs necessary to begin developing applications on the Android platform using the Java programming language.
Features
· Application framework enabling reuse and replacement of components
· Dalvik virtual machine optimized for mobile devices
· Integrated browser based on the open source WebKit engine
· Optimized graphics powered by a custom 2D graphics library; 3D graphics based on the OpenGL ES 1.0 specification (hardware acceleration optional)
· SQLite for structured data storage
· Media support for common audio, video, and still image formats (MPEG4, H.264, MP3, AAC, AMR, JPG, PNG, GIF)
· GSM Telephony (hardware dependent)
· Bluetooth, EDGE, 3G, and WiFi (hardware dependent)
· Camera, GPS, compass, and accelerometer (hardware dependent)
· Rich development environment including a device emulator, tools for debugging, memory and performance profiling, and a plugin for the Eclipse IDE
Android Architecture
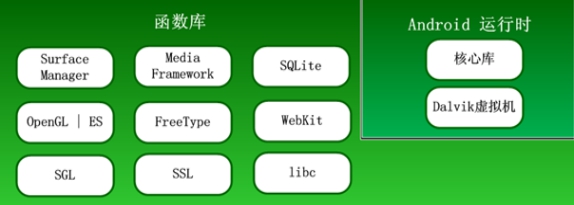
The following diagram shows the major components of the Android operating system. Each section is described in more detail below.

Applications
Android will ship with a set of core applications including an email client, SMS program, calendar, maps, browser, contacts, and others. All applications are written using the Java programming language.

Application Framework
Developers have full access to the same framework APIs used by the core applications. The application architecture is designed to simplify the reuse of components; any application can publish its capabilities and any other application may then make use of those capabilities (subject to security constraints enforced by the framework). This same mechanism allows components to be replaced by the user.
Underlying all applications is a set of services and systems, including:
· A rich and extensible set of Views that can be used to build an application, including lists, grids, text boxes, buttons, and even an embeddable web browser
· Content Providers that enable applications to access data from other applications (such as Contacts), or to share their own data
· A Resource Manager, providing access to non-code resources such as localized strings, graphics, and layout files
· A Notification Manager that enables all applications to display custom alerts in the status bar
· An Activity Manager that manages the life cycle of applications and provides a common navigation backstack
For more details and a walkthrough of an application, see Writing an Android Application.

Libraries
Android includes a set of C/C++ libraries used by various components of the Android system. These capabilities are exposed to developers through the Android application framework. Some of the core libraries are listed below:
· System C library - a BSD-derived implementation of the standard C system library (libc), tuned for embedded Linux-based devices
· Media Libraries - based on PacketVideo's OpenCORE; the libraries support playback and recording of many popular audio and video formats, as well as static image files, including MPEG4, H.264, MP3, AAC, AMR, JPG, and PNG
· Surface Manager - manages access to the display subsystem and seamlessly composites 2D and 3D graphic layers from multiple applications
· LibWebCore - a modern web browser engine which powers both the Android browser and an embeddable web view
· SGL - the underlying 2D graphics engine
· 3D libraries - an implementation based on OpenGL ES 1.0 APIs; the libraries use either hardware 3D acceleration (where available) or the included, highly optimized 3D software rasterizer
· FreeType - bitmap and vector font rendering
· SQLite - a powerful and lightweight relational database engine available to all applications
Android Runtime
Android includes a set of core libraries that provides most of the functionality available in the core libraries of the Java programming language.
Every Android application runs in its own process, with its own instance of the Dalvik virtual machine. Dalvik has been written so that a device can run multiple VMs efficiently. The Dalvik VM executes files in the Dalvik Executable (.dex) format which is optimized for minimal memory footprint. The VM is register-based, and runs classes compiled by a Java language compiler that have been transformed into the .dex format by the included "dx" tool.
The Dalvik VM relies on the Linux kernel for underlying functionality such as threading and low-level memory management.
Linux Kernel
Android relies on Linux version 2.6 for core system services such as security, memory management, process management, network stack, and driver model. The kernel also acts as an abstraction layer between the hardware and the rest of the software stack.

Using XML-Based Layouts
While it is technically possible to create and attach widgets to our activity purely through Java code, the way we did in Chapter 4, the more common approach is to use an XML-based layout file. Dynamic instantiation of widgets is reserved for more complicated scenarios, where the widgets are not known at compile-time (e g., populating a column of radio buttons based on data retrieved off the Internet).
With that in mind, it’s time to break out the XML and learn how to lay out Android activities that way.
What Is an XML-Based Layout?
As the name suggests, an XML-based layout is a specification of widgets’ relationships to each other—and to their containers (more on this in Chapter 7)—encoded in XML format. Specifically, Android considers XML-based layouts to be resources, and as such layout files are stored in the res/layout directory inside your Android project.
Each XML file contains a tree of elements specifying a layout of widgets and their containers that make up one view hierarchy. The attributes of the XML elements are properties, describing how a widget should look or how a container should behave. For example, if a Button element has an attribute value of android:textStyle = "bold", that means that the text appearing on the face of the button should be rendered in a boldface font style.
Android’s SDK ships with a tool (aapt) which uses the layouts. This tool should be automatically invoked by your Android tool chain (e.g., Eclipse, Ant’s build.xml). Of particular importance to you as a developer is that aapt generates the R.java source file within your project, allowing you to access layouts and widgets within those layouts directly from your Java code.
Why Use XML-Based Layouts?
Most everything you do using XML layout files can be achieved through Java code. For example, you could use setTypeface() to have a button render its text in bold, instead of using a property in an XML layout. Since XML layouts are yet another file for you to keep track of, we need good reasons for using such files.
Perhaps the biggest reason is to assist in the creation of tools for view definition, such as a GUI builder in an IDE like Eclipse or a dedicated Android GUI designer like DroidDraw1. Such GUI builders could, in principle, generate Java code instead of XML. The challenge is re-reading the UI definition to support edits—that is far simpler if the data is in a structured format like XML than in a programming language. Moreover, keeping generated XML definitions separated from hand-written Java code makes it less likely that somebody’s custom-crafted source will get clobbered by accident when the generated bits get re-generated. XML forms a nice middle ground between something that is easy for tool-writers to use and easy for programmers to work with by hand as needed.
Also, XML as a GUI definition format is becoming more commonplace. Microsoft’s XAML2, Adobe’s Flex3, and Mozilla’s XUL4 all take a similar approach to that of Android: put layout details in an XML file and put programming smarts in source files (e.g., JavaScript for XUL). Many less-well-known GUI frameworks, such as ZK5, also use XML for view definition. While “following the herd” is not necessarily the best policy, it does have the advantage of helping to ease the transition into Android from any other XML-centered view description language.
Employing Basic Widgets
Every GUI toolkit has some basic widgets: fields, labels, buttons, etc. Android’s toolkit is no different in scope, and the basic widgets will provide a good introduction as to how widgets work in Android activities.
Assigning Labels
The simplest widget is the label, referred to in Android as a TextView. Like in most GUI toolkits, labels are bits of text not editable directly by users. Typically, they are used to identify adjacent widgets (e.g., a “Name:” label before a field where one fills in a name).
In Java, you can create a label by creating a TextView instance. More commonly, though, you will create labels in XML layout files by adding a TextView element to the layout, with an android:text property to set the value of the label itself. If you need to swap labels based on certain criteria, such as internationalization, you may wish to use a resource reference in the XML instead, as will be described in Chapter 9. TextView has numerous other properties of relevance for labels, such as:
• android:typeface to set the typeface to use for the label (e.g., monospace)
• android:textStyle to indicate that the typeface should be made bold (bold), italic (italic),or bold and italic (bold_italic)
• android:textColor to set the color of the label’s text, in RGB hex format (e.g., #FF0000 for red)
For example, in the Basic/Label project, you will find the following layout file:
<?xml version="1.0" encoding="utf-8"?>
<TextView xmlns:android=http://schemas.android.com/apk/res/android
android:layout_width="fill_parent"
android:layout_height="wrap_content"
android:text="You were expecting something profound?" />
As you can see in Figure 6-1, just that layout alone, with the stub Java source provided by Android’s project builder (e.g., activityCreator), gives you the application.
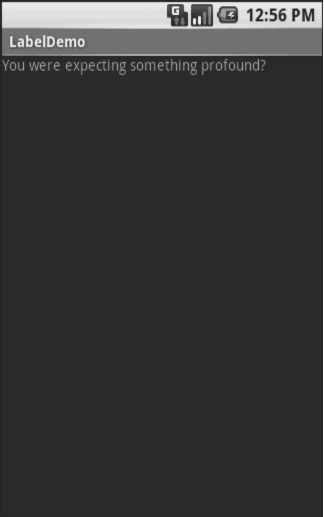
Figure 6-1. The LabelDemo sample application
Button, Button, Who’s Got the Button?
We’ve already seen the use of the Button widget in Chapters 4 and 5. As it turns out, Button is a subclass of TextView, so everything discussed in the preceding section in terms of formatting the face of the button still holds.
Fleeting Images
Android has two widgets to help you embed images in your activities: ImageView and ImageButton. As the names suggest, they are image-based analogues to TextView and Button, respectively.
Each widget takes an android:src attribute (in an XML layout) to specify what picture to use. These usually reference a drawable resource, described in greater detail in the chapter on resources. You can also set the image content based on a Uri from a content provider via setImageURI().
ImageButton, a subclass of ImageView, mixes in the standard Button behaviors, for responding to clicks and whatnot.
For example, take a peek at the main.xml layout from the Basic/ImageView sample project which is found along with all other code samples at http://apress.com:
<?xml version="1.0" encoding="utf-8"?>
<ImageView xmlns:android=http://schemas.android.com/apk/res/android
android:id="@+id/icon"
android:layout_width="fill_parent"
android:layout_height="fill_parent"
android:adjustViewBounds="true"
android:src="@drawable/molecule" />
The result, just using the code-generated activity, is shown in Figure 6-2.
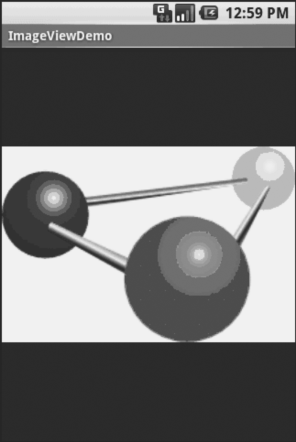
Figure 6-2. The ImageViewDemo sample application
Fields of Green. Or Other Colors.
Along with buttons and labels, fields are the third “anchor” of most GUI toolkits. In Android, they are implemented via the EditText widget, which is a subclass of the TextView used for labels.
Along with the standard TextView properties (e.g., android:textStyle), EditText has many others that will be useful for you in constructing fields, including:
• android:autoText, to control if the field should provide automatic spelling assistance
• android:capitalize, to control if the field should automatically capitalize the first letter of entered text (e.g., first name, city)
• android:digits, to configure the field to accept only certain digits
• android:singleLine, to control if the field is for single-line input or multiple-line input (e.g., does <Enter> move you to the next widget or add a newline?)
Beyond those, you can configure fields to use specialized input methods, such as
android:numeric for numeric-only input, android:password for shrouded password input,
and android:phoneNumber for entering in phone numbers. If you want to create your own input method scheme (e.g., postal codes, Social Security numbers), you need to create your own implementation of the InputMethod interface, then configure the field to use it via android: inputMethod.
For example, from the Basic/Field project, here is an XML layout file showing an EditText:
<?xml version="1.0" encoding="utf-8"?>
<EditText
xmlns:android=http://schemas.android.com/apk/res/android android:id="@+id/field"
android:layout_width="fill_parent"
android:layout_height="fill_parent"
android:singleLine="false" />
Note that android:singleLine is false, so users will be able to enter in several lines of text. For this project, the FieldDemo.java file populates the input field with some prose:
package com.commonsware.android.basic;
import android.app.Activity;
import android.os.Bundle;
import android.widget.EditText;
public class FieldDemo extends Activity { @Override
public void onCreate(Bundle icicle) { super.onCreate(icicle);
setContentView(R.layout.main);
EditText fld=(EditText)findViewById(R.id.field);
fld.setText("Licensed under the Apache License, Version 2.0 " + "(the \"License\"); you may not use this file " + "except in compliance with the License. You may " + "obtain a copy of the License at " +
"http://www.apache.org/licenses/LICENSE-2.0");
}
}
The result, once built and installed into the emulator, is shown in Figure 6-3.
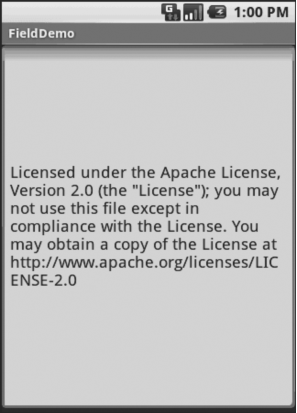
Figure 6-3. The FieldDemo sample application
Note Android’s emulator only allows one application in the launcher per unique Java package. Since all the demos in this chapter share the com.commonsware.android.basic package, you will only see one of these demos in your emulator’s launcher at any one time.
Another flavor of field is one that offers auto-completion, to help users supply a value without typing in the whole text. That is provided in Android as the AutoCompleteTextView widget and is discussed in Chapter 8.
Just Another Box to Check
The classic checkbox has two states: checked and unchecked. Clicking the checkbox toggles between those states to indicate a choice (e.g., “Add rush delivery to my order”). In Android, there is a CheckBox widget to meet this need. It has TextView as an ancestor, so you can use TextView properties like android:textColor to format the widget. Within Java, you can invoke:
• isChecked() to determine if the checkbox has been checked
• setChecked() to force the checkbox into a checked or unchecked state
• toggle() to toggle the checkbox as if the user checked it
Also, you can register a listener object (in this case, an instance of OnCheckedChangeListener) to be notified when the state of the checkbox changes.
For example, from the Basic/CheckBox project, here is a simple checkbox layout:
<?xml version="1.0" encoding="utf-8"?>
<CheckBox xmlns:android="http://schemas.android.com/apk/res/android"
android:id="@+id/check"
android:layout_width="wrap_content"
android:layout_height="wrap_content"
android:text="This checkbox is: unchecked" />
The corresponding CheckBoxDemo.java retrieves and configures the behavior of the checkbox:
public class CheckBoxDemo extends Activity
implements CompoundButton.OnCheckedChangeListener { CheckBox cb;
@Override
public void onCreate(Bundle icicle) { super.onCreate(icicle);
setContentView(R.layout.main);
cb=(CheckBox)findViewById(R.id.check);
cb.setOnCheckedChangeListener(this);
}
public void onCheckedChanged(CompoundButton buttonView,
boolean isChecked) {
if (isChecked) {
cb.setText("This checkbox is: checked");
}
else {
cb.setText("This checkbox is: unchecked");
}
}
}
Note that the activity serves as its own listener for checkbox state changes since it implements the OnCheckedChangeListener interface (via cb.setOnCheckedChangeListener(this)). The callback for the listener is onCheckedChanged(), which receives the checkbox whose state has changed and what the new state is. In this case, we update the text of the checkbox to reflect what the actual box contains.
The result? Clicking the checkbox immediately updates its text, as you can see in Figures 6-4 and 6-5.
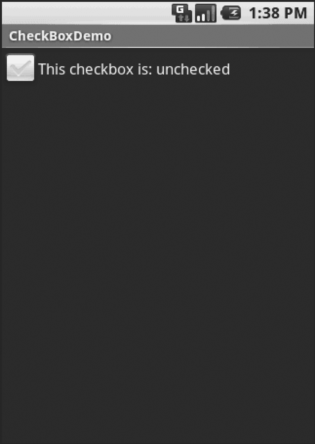
Figure 6-4. The CheckBoxDemo sample application, with the checkbox unchecked
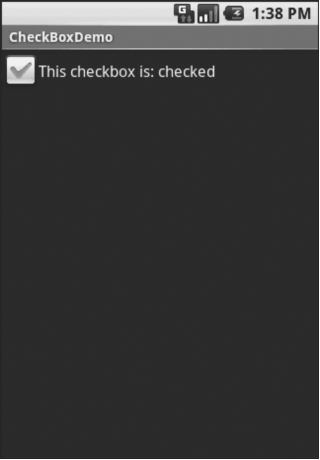
Figure 6-5. The same application, now with the checkbox checked
Turn the Radio Up
As with other implementations of radio buttons in other toolkits, Android’s radio buttons are two-state, like checkboxes, but can be grouped such that only one radio button in the group can be checked at any time.
Like CheckBox, RadioButton inherits from CompoundButton, which in turn inherits from
TextView. Hence, all the standard TextView properties for font face, style, color, etc., are available for controlling the look of radio buttons. Similarly, you can call isChecked() on a RadioButton to see if it is selected, toggle() to select it, and so on, like you can with a CheckBox.
Most times, you will want to put your RadioButton widgets inside of a RadioGroup. The RadioGroup indicates a set of radio buttons whose state is tied, meaning only one button out of the group can be selected at any time. If you assign an android:id to your RadioGroup in your XML layout, you can access the group from your Java code and invoke:
• check() to check a specific radio button via its ID (e.g., group.check(R.id.radio1))
• clearCheck() to clear all radio buttons, so none in the group are checked
• getCheckedRadioButtonId() to get the ID of the currently-checked radio button (or -1 if none are checked)
For example, from the Basic/RadioButton sample application, here is an XML layout showing a RadioGroup wrapping a set of RadioButton widgets:
<?xml version="1.0" encoding="utf-8"?> <RadioGroup
xmlns:android=http://schemas.android.com/apk/res/android
android:orientation="vertical"
android:layout_width="fill_parent"
android:layout_height="fill_parent" >
<RadioButton android:id="@+id/radio1"
android:layout_width="wrap_content"
android:layout_height="wrap_content"
android:text="Rock" />
<RadioButton android:id="@+id/radio2"
android:layout_width="wrap_content"
android:layout_height="wrap_content"
android:text="Scissors" />
<RadioButton android:id="@+id/radio3"
android:layout_width="wrap_content"
android:layout_height="wrap_content"
android:text="Paper" />
</RadioGroup>
Figure 6-6 shows the result using the stock Android-generated Java for the project and this layout.
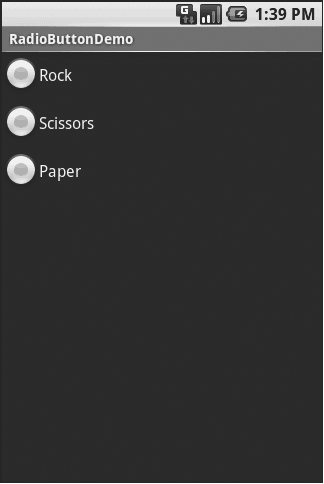
Figure 6-6. The RadioButtonDemo sample application


