Temperature Control Using a Microcontroller:
An Interdisciplinary Undergraduate Engineering Design Project
James S. McDonald
Department of Engineering Science
Trinity University
San Antonio, TX 78212
Abstract:This paper describes an interdisciplinary design project which was done under the author’s supervision by a group of four senior students in the Department of Engineering Science at Trinity University. The objective of the project was to develop a temperature control system for an air-filled chamber. The system was to allow entry of a desired chamber temperature in a prescribed range and to exhibit overshoot and steady-state temperature error of less than 1 degree Kelvin in the actual chamber temperature step response. The details of the design developed by this group of students, based on a Motorola MC68HC05 family microcontroller, are described. The pedagogical value of the problem is also discussed through a description of some of the key steps in the design process. It is shown that the solution requires broad knowledge drawn from several engineering disciplines including electrical, mechanical, and control systems engineering.
1 Introduction
The design project which is the subject of this paper originated from a real-world application. A prototype of a microscope slide dryer had been developed around an OmegaTM model CN-390 temperature controller, and the objective was to develop a custom temperature control system to replace the Omega system. The motivation was that a custom controller targeted specifically for the application should be able to achieve the same functionality at a much lower cost, as the Omega system is unnecessarily versatile and equipped to handle a wide variety of applications.
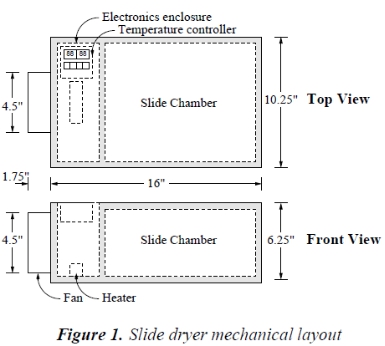
The mechanical layout of the slide dryer prototype is shown in Figure 1. The main element of the dryer is a large, insulated, air-filled chamber in which microscope slides, each with a tissue sample encased in paraffin, can be set on caddies. In order that the paraffin maintain the proper consistency, the temperature in the slide chamber must be maintained at a desired (constant) temperature. A second chamber (the electronics enclosure) houses a resistive heater and the temperature controller, and a fan mounted on the end of the dryer blows air across the heater, carrying heat into the slide chamber. This design project was carried out during academic year 1996–97 by four students under the author’s supervision as a Senior Design project in the Department of Engineering Science at Trinity University. The purpose of this paper is
to describe the problem and the students’ solution in some detail, and to discuss some of the pedagogical opportunities offered by an interdisciplinary design project of this type. The students’ own report was presented at the 1997 National Conference on Undergraduate Research [1]. Section 2 gives a more detailed statement of the problem, including performance specifications, and Section 3 describes the students’ design. Section 4 makes up the bulk of the paper, and discusses in some detail several aspects of the design process which offer unique pedagogical opportunities. Finally, Section 5 offers some conclusions.
2 Problem Statement
The basic idea of the project is to replace the relevant parts of the functionality of an Omega CN-390 temperature controller using a custom-designed system. The application dictates that temperature settings are usually kept constant for long periods of time, but it’s nonetheless important that step changes be tracked in a “reasonable” manner. Thus the main requirements boil down to
·allowing a chamber temperature set-point to be entered,
·displaying both set-point and actual temperatures, and
·tracking step changes in set-point temperature with acceptable rise time, steady-state error, and overshoot.
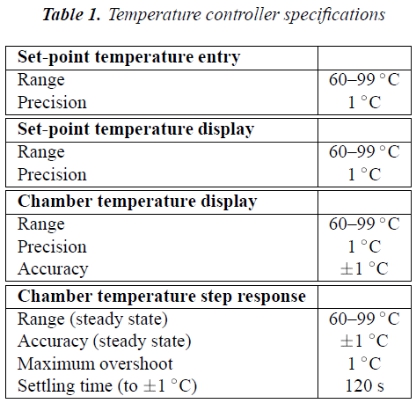
Although not explicitly a part of the specifications in Table 1, it was clear that the customer desired digital displays of set-point and actual temperatures, and that set-point temperature entry should be digital as well (as opposed to, say, through a potentiometer setting).
3 System Design
The requirements for digital temperature displays and setpoint entry alone are enough to dictate that a microcontrollerbased design is likely the most appropriate. Figure 2 shows a block diagram of the students’ design.
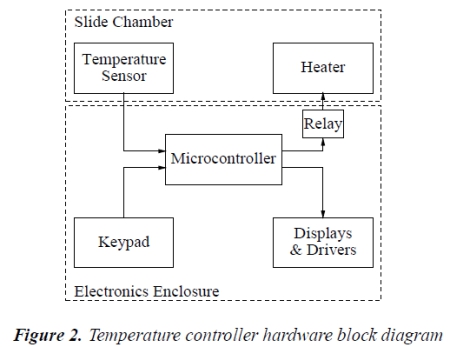
The microcontroller, a MotorolaMC68HC705B16 (6805 for short), is the heart of the system. It accepts inputs from a simple four-key keypad which allow specification of the set-point temperature, and it displays both set-point and measured chamber temperatures using two-digit seven-segment LED displays controlled by a display driver. All these inputs and outputs are accommodated by parallel ports on the 6805. Chamber temperature is sensed using a pre-calibrated thermistor and input via one of the 6805’s analog-to-digital inputs. Finally, a pulse-width modulation (PWM) output on the 6805 is used to drive a relay which switches line power to the resistive heater off and on.
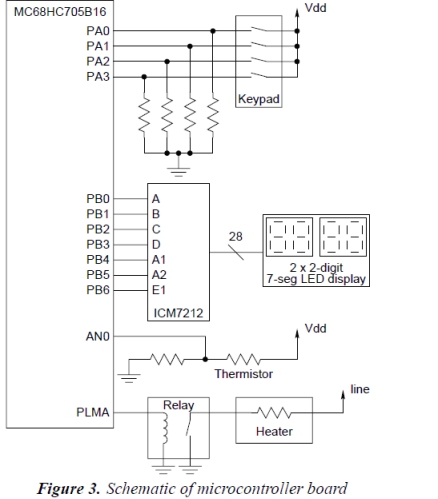
Figure 3 shows a more detailed schematic of the electronics and their interfacing to the 6805. The keypad, a Storm 3K041103, has four keys which are interfaced to pins PA0{ PA3 of Port A, configured as inputs. One key functions as a mode switch. Two modes are supported: set mode and run mode. In set mode two of the other keys are used to specify the set-point temperature: one increments it and one decrements. The fourth key is unused at present. The LED displays are driven by a Harris Semiconductor ICM7212 display driver interfaced to pins PB0{PB6 of Port B, configured as outputs. The temperature-sensing thermistor drives, through a voltage divider, pin AN0 (one of eight analog inputs). Finally, pin PLMA (one of two PWM outputs) drives the heater relay.
Software on the 6805 implements the temperature control algorithm, maintains the temperature displays, and alters the set-point in response to keypad inputs. Because it is not complete at this writing, software will not be discussed in detail in this paper. The control algorithm in particular has not been determined, but it is likely to be a simple proportional controller and certainly not more complex than a PID. Some control design issues will be discussed in Section 4, however.
4 The Design Process
Although essentially the project is just to build a thermostat, it presents many nice pedagogical opportunities. The knowledge and experience base of a senior engineering undergraduate are just enough to bring him or her to the brink of a solution to various aspects of the problem. Yet, in each case, realworld considerations complicate the situation significantly.
Fortunately these complications are not insurmountable, and the result is a very beneficial design experience. The remainder of this section looks at a few aspects of the problem which present the type of learning opportunity just described. Section 4.1 discusses some of the features of a simplified mathematical model of the thermal properties of the system and how it can be easily validated experimentally. Section 4.2 describes how realistic control algorithm designs can be arrived at using introductory concepts in control design. Section 4.3 points out some important deficiencies of such a simplified modeling/control design process and how they can be overcome through simulation. Finally, Section 4.4 gives an overview of some of the microcontroller-related design issues which arise and learning opportunities offered.
4.1 MathematicalModel
Lumped-element thermal systems are described in almost any introductory linear control systems text, and just this sort of model is applicable to the slide dryer problem. Figure 4 shows a second-order lumped-element thermal model of the slide dryer. The state variables are the temperatures Ta of the air in the box and Tb of the box itself. The inputs to the system are the power output q(t) of the heater and the ambient temperature T¥. ma and mb are the masses of the air and the box, respectively, and Ca and Cb their specific heats. μ1 and μ2 are heat transfer coefficients from the air to the box and from the box to the external world, respectively.
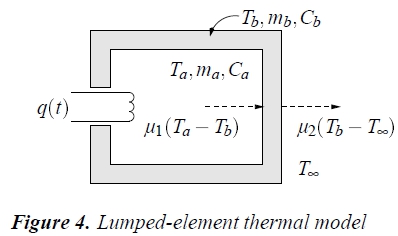
It’s not hard to show that the (linearized) state equationscorresponding to Figure 4 are

Taking Laplace transforms of (1) and (2) and solving for Ta(s), which is the output of interest, gives the following open-loop model of the thermal system:

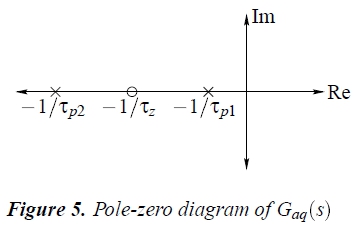
where K is a constant and D(s) is a second-order polynomial.K, tz, and the coefficients of D(s) are functions of the variousparameters appearing in (1) and (2).Of course the various parameters in (1) and (2) are completely unknown, but it’s not hard to show that, regardless of their values, D(s) has two real zeros. Therefore the main transfer function of interest (which is the one from Q(s), since we’ll assume constant ambient temperature) can be written

Moreover, it’s not too hard to show that 1=tp1 <1=tz <1=tp2, i.e., that the zero lies between the two poles. Both of these are excellent exercises for the student, and the result is the openloop pole-zero diagram of Figure 5.
Obtaining a complete thermal model, then, is reduced to identifying the constant K and the three unknown time constants in (3). Four unknown parameters is quite a few, but simple experiments show that 1=tp1 _ 1=tz;1=tp2 so that tz;tp2 _ 0 are good approximations. Thus the open-loop system is essentially first-order and can therefore be written

(where the subscript p1 has been dropped).
Simple open-loop step response experiments show that,for a wide range of initial temperatures and heat inputs, K _0:14 _=W and t _ 295 s.1
4.2 Control System Design
Using the first-order model of (4) for the open-loop transfer function Gaq(s) and assuming for the moment that linear control of the heater power output q(t) is possible, the block diagram of Figure 6 represents the closed-loop system. Td(s) is the desired, or set-point, temperature,C(s) is the compensator transfer function, and Q(s) is the heater output in watts.

Given this simple situation, introductory linear control design tools such as the root locus method can be used to arrive at a C(s) which meets the step response requirements on rise time, steady-state error, and overshoot specified in Table 1. The upshot, of course, is that a proportional controller with sufficient gain can meet all specifications. Overshoot is impossible, and increasing gains decreases both steady-state error and rise time.
Unfortunately, sufficient gain to meet the specifications may require larger heat outputs than the heater is capable of producing. This was indeed the case for this system, and the result is that the rise time specification cannot be met. It is quite revealing to the student how useful such an oversimplified model, carefully arrived at, can be in determining overall performance limitations.
4.3 Simulation Model
Gross performance and its limitations can be determined using the simplified model of Figure 6, but there are a number of other aspects of the closed-loop system whose effects on performance are not so simply modeled. Chief among these are
·quantization error in analog-to-digital conversion of the measured temperature and
· the use of PWM to control the heater.
Both of these are nonlinear and time-varying effects, and the only practical way to study them is through simulation (or experiment, of course).
Figure 7 shows a SimulinkTM block diagram of the closed-loop system which incorporates these effects. A/D converter quantization and saturation are modeled using standard Simulink quantizer and saturation blocks. Modeling PWM is more complicated and requires a custom S-function to represent it.

This simulation model has proven particularly useful in gauging the effects of varying the basic PWM parameters and hence selecting them appropriately. (I.e., the longer the period, the larger the temperature error PWM introduces. On the other hand, a long period is desirable to avoid excessive relay “chatter,” among other things.) PWM is often difficult for students to grasp, and the simulation model allows an exploration of its operation and effects which is quite revealing.
4.4 The Microcontroller
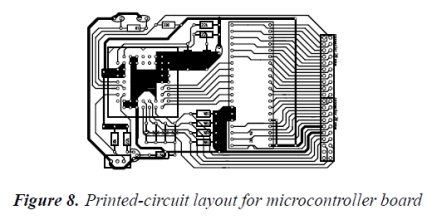
Simple closed-loop control, keypad reading, and display control are some of the classic applications of microcontrollers, and this project incorporates all three. It is therefore an excellent all-around exercise in microcontroller applications. In addition, because the project is to produce an actual packaged prototype, it won’t do to use a simple evaluation board with the I/O pins jumpered to the target system. Instead, it’s necessary to develop a complete embedded application. This entails the choice of an appropriate part from the broad range offered in a typical microcontroller family and learning to use a fairly sophisticated development environment. Finally, a custom printed-circuit board for the microcontroller and peripherals must be designed and fabricated.
Microcontroller Selection. In view of existing local expertise, the Motorola line of microcontrollers was chosen for this project. Still, this does not narrow the choice down much. A fairly disciplined study of system requirements is necessary to specify which microcontroller, out of scores of variants, is required for the job. This is difficult for students, as they generally lack the experience and intuition needed as well as the perseverance to wade through manufacturers’ selection guides.
Part of the problem is in choosing methods for interfacing the various peripherals (e.g., what kind of display driver should be used?). A study of relevant Motorola application notes [2, 3, 4] proved very helpful in understandingwhat basic approaches are available, and what microcontroller/peripheral combinations should be considered.
The MC68HC705B16 was finally chosen on the basis of its availableA/D inputs and PWMoutputs as well as 24 digital I/O lines. In retrospect this is probably overkill, as only one A/D channel, one PWM channel, and 11 I/O pins are actually required (see Figure 3). The decision was made to err on the safe side because a complete development system specific to the chosen part was necessary, and the project budget did not permit a second such system to be purchased should the first
prove inadequate.
Microcontroller Application Development. Breadboarding of the peripheral hardware, development of microcontroller software, and final debugging and testing of a custom printed-circuit board for the microcontroller and peripherals all require a development environment of some kind. The choice of a development environment, like that of the microcontroller itself, can be bewildering and requires some faculty expertise. Motorola makes three grades of development environment ranging from simple evaluation boards (at around $100) to full-blown real-time in-circuit emulators (at more like $7500). The middle option was chosen for this project: the MMEVS, which consists of _ a platform board (which supports all 6805-family parts), _ an emulator module (specific to B-series parts), and _ a cable and target head adapter (package-specific). Overall, the system costs about $900 and provides, with some limitations, in-circuit emulation capability. It also comes with the simple but sufficient software development environment RAPID [5].
Students find learning to use this type of system challenging, but the experience they gain in real-world microcontroller application development greatly exceeds the typical first-course experience using simple evaluation boards.
Printed-Circuit Board. The layout of a simple (though definitely not trivial) printed-circuit board is another practical learning opportunity presented by this project. The final board layout, with package outlines, is shown (at 50% of actual size) in Figure 8. The relative simplicity of the circuit makes manual placement and routing practical—in fact, it likely gives better results than automatic in an application like this—and the student is therefore exposed to fundamental issues of printed-circuit layout and basic design rules. The layout software used was the very nice package pcb,2 and the board was fabricated in-house with the aid of our staff electronics technician.
